In my last post, we managed to get temperature and humidity reading from a DHT11 using an Arduino Uno. My Arduino Uno also has Wifi capabilities, so we saw how to obtain an IP address and forward our reading to a public website like Httpbin.org. Httpbin.org was then kind enough to accept and return our JSON data with our http headers. We even managed to send our JSON data to httpbin.org, a public website using HTTPS protocol. This way our temperature and humidity readings are encrypted and secured as they travel the web.
This time we will setup the Azure Cosmos emulator on our laptops. This will be used to save our temperature and humidity readings to our laptop. This is so we can restore our readings and then present them on a colourful graph using D3js and Angular. In order to save and restore our reading from Cosmos we will build a Web API from scratch. Web APIs are cool because we can call them for any device that is connected to the internet including mobile devices and Arduinos with Wifi capability. They usually speak JSON which is a very light data structure and tend to use the same ports that the internet uses i.e. 80 for http traffic and 443 for https secure traffic.
We will also use C# to build our Temperature Log Web API as it is a widely used industrial language and .NETCore which will allow our Web API to run on a small Linux image instead of needs a big server with lots of CPU and hard disk space. We will even look at the Repository pattern and Dependency Injection principle, but don’t worry about all these technical terms, they are really simple concepts and we will get to them shortly.
Let’s dig in
How to install Azure Cosmos emulator?
The Azure Cosmos emulator allows use to develop application locally. We then just needs to make some minor updates to our application’s configuration and it should start working with Azure Cosmos DB in the cloud. It is a NoSQL DB and works well with the JSON data. We will get to NoSQL vs SQL and the other DB types in another blog post.
1. The install file is a single executable file that can be found here
2. After you download the file, run the setup and you should see something like this, please read and accept the terms and click Install

3. After the files are installed, make sure ‘Launch Azure Cosmos DB Emulator’ is checked and click Finish.

4. After a minute or two, your browse should automatically open with a page like this which say ‘Congratulations! Your Azure Cosmos DB emulator is running”
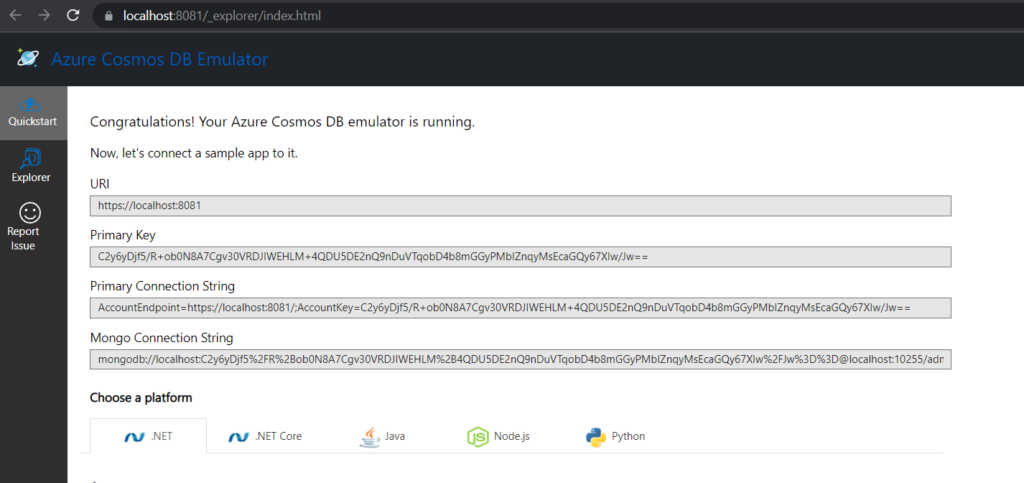
and you should see a little Azure Cosmos Emulator icon in your taskbar near the speaker icon. You can even right-click on the icon and select ‘Display Data Explorer…’ to get to the above details in your browse in case you close it

Next we going to install Visual Studio which is going to help us create our Web API
How to install Visual Studio Community edition?
Visual Studio is an Awesome tool for windows and web development. There are a few editions to choose from. We are going to install the 2019 Community edition, which is free for individuals like us that want to play around and experiment with new cool technologies. There is also Visual Studio Code which is a lighter version of Visual Studio, which we will cover in the another blog post.
1. The install file is a single executable file that can be found here. Locate the community edition and download it.
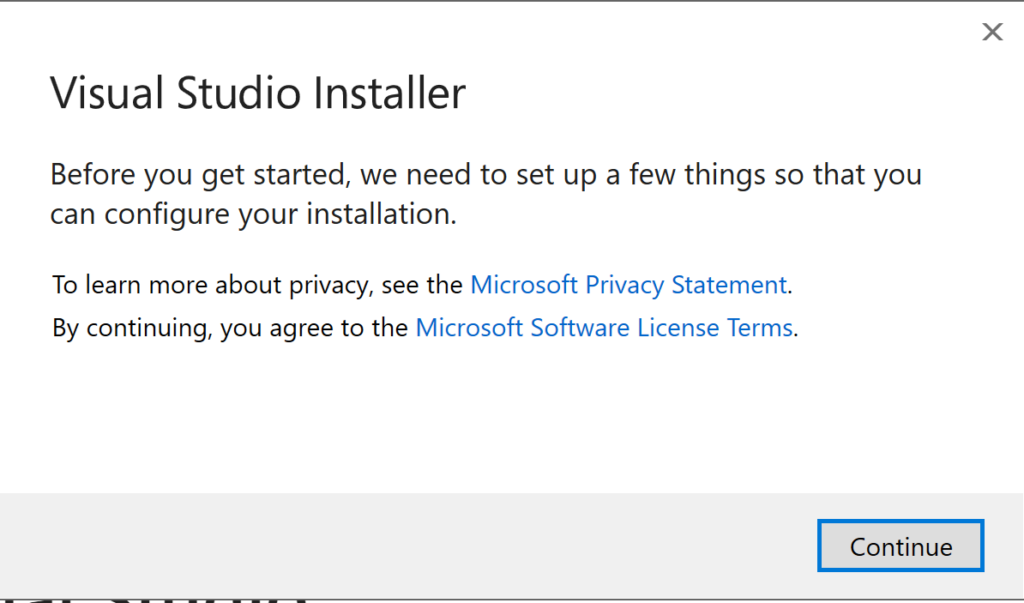
2. After you download the file, run the setup and you should see something like this, please read the terms and click Continue
3. The install should download a few packages and give use a install page that looks like the below. Select ‘ASP.Net and web development’ and ‘Azure development’ and click Install. In this case we can see the download is about 10.31GB, so make sure you have enough space on your C: drive. If not, click on the ‘Installation Location’ tab and choose another drive on your laptop that has the space
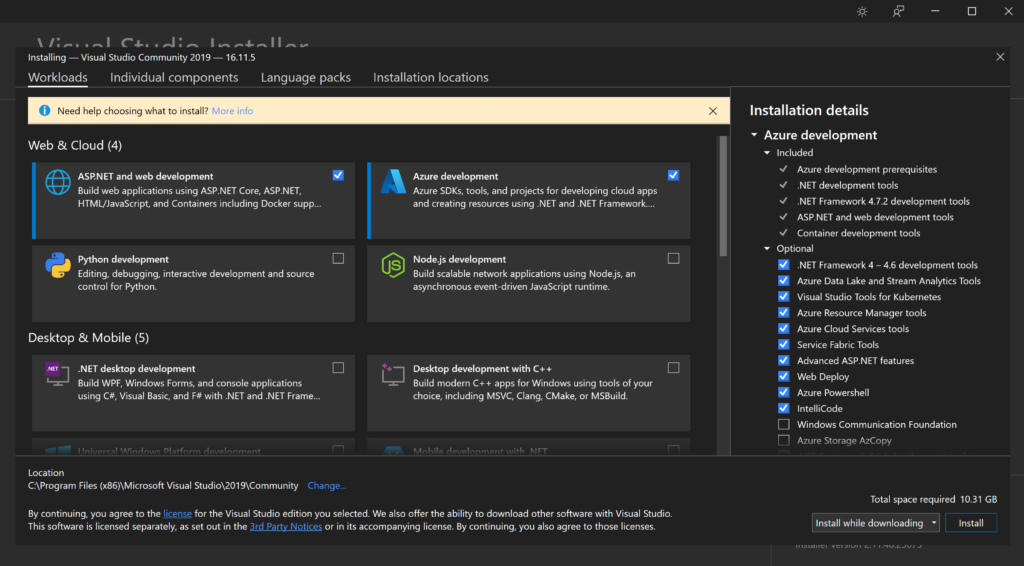
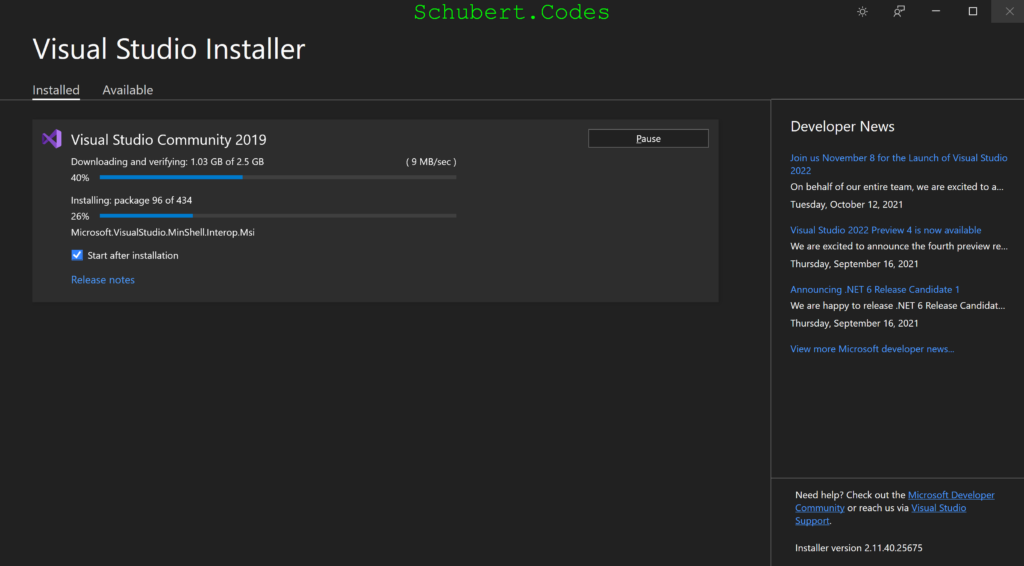
4. As we can see, Visual Studio 2019 Community is getting installed. If you have a newer version like 2022 or higher ,don’t worry, the rest of the blog shouldn’t be too far off. Now sit back and relax while the install takes place
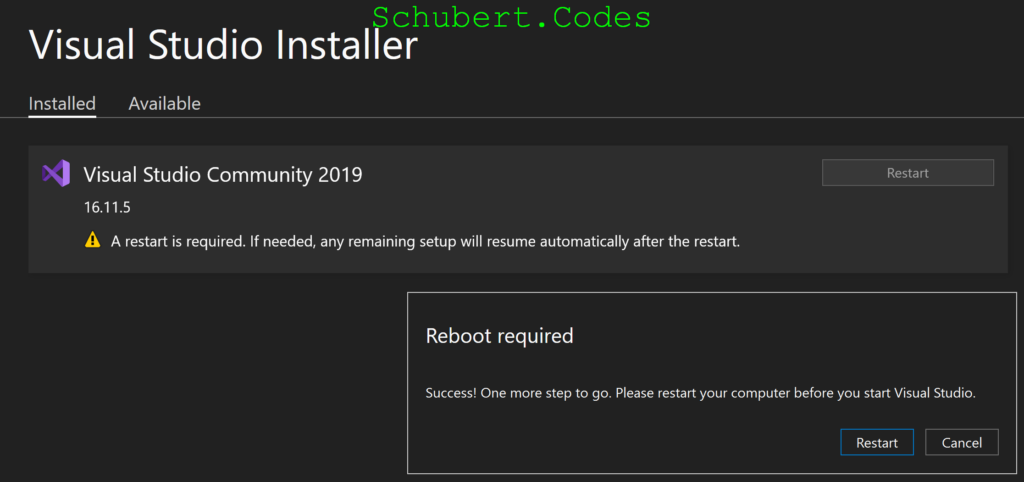
5. In my case a reboot was needed. Make sure you save any work and reboot your laptop to complete the install
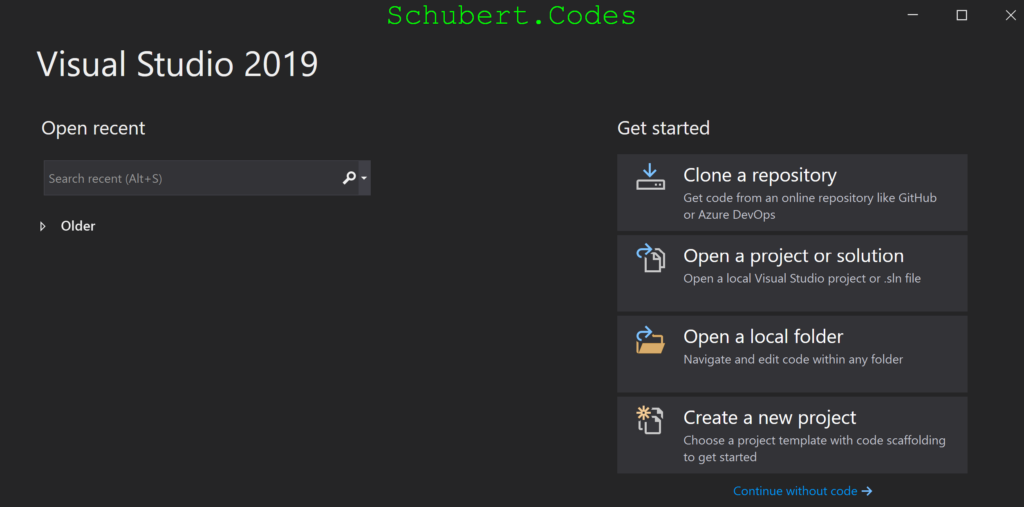
6. If you try and start VS 2019 after the restart, hopefully you should see something like this. Because I’ve used VS 2019 before on my laptop, it has connected my VS install to my online account. You can connect your VS to your email account or should get 90 days to do so if I haven’t mistaken

7. And finally you should see a screen like this. This means your VS 2019 installation is complete and we can finally get started on our Web API code
How to create a basic C# .NETCore Web API?
We are pretty much going to compile and look at the default Web API that VS2019 give us out of the box when we create a new Web API project. This is ironically a weather forecast endpoint that will give us random numbers as temperature readings.
Start by click on “Create a new project”. Search for “API” and choose “C#” as the language and “Cloud” as the project type. You should hopefully see a project type “ASP.Net Core Web API”
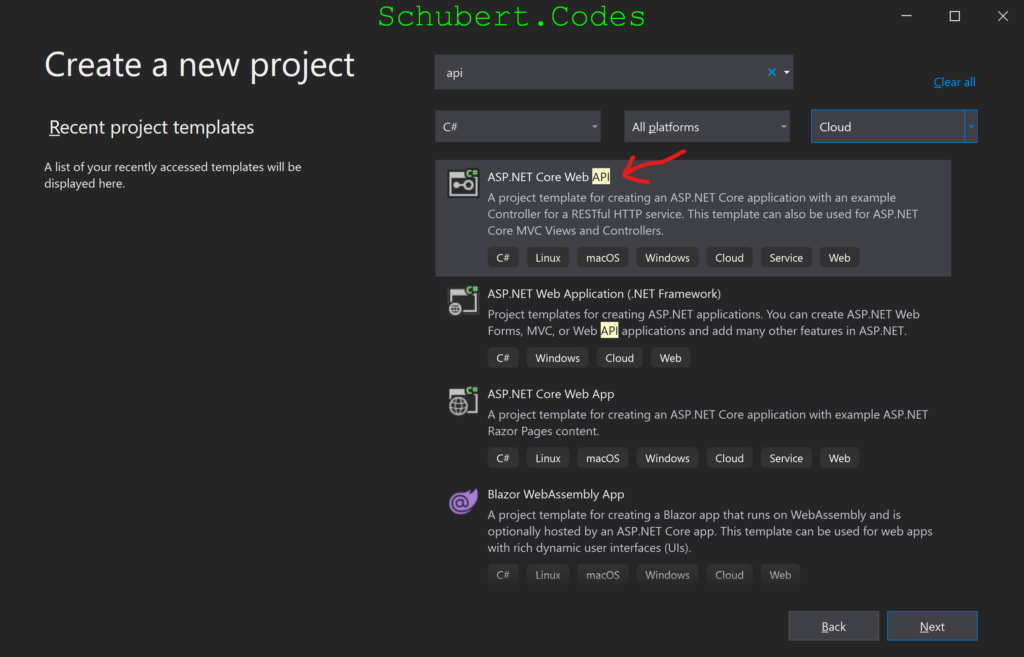
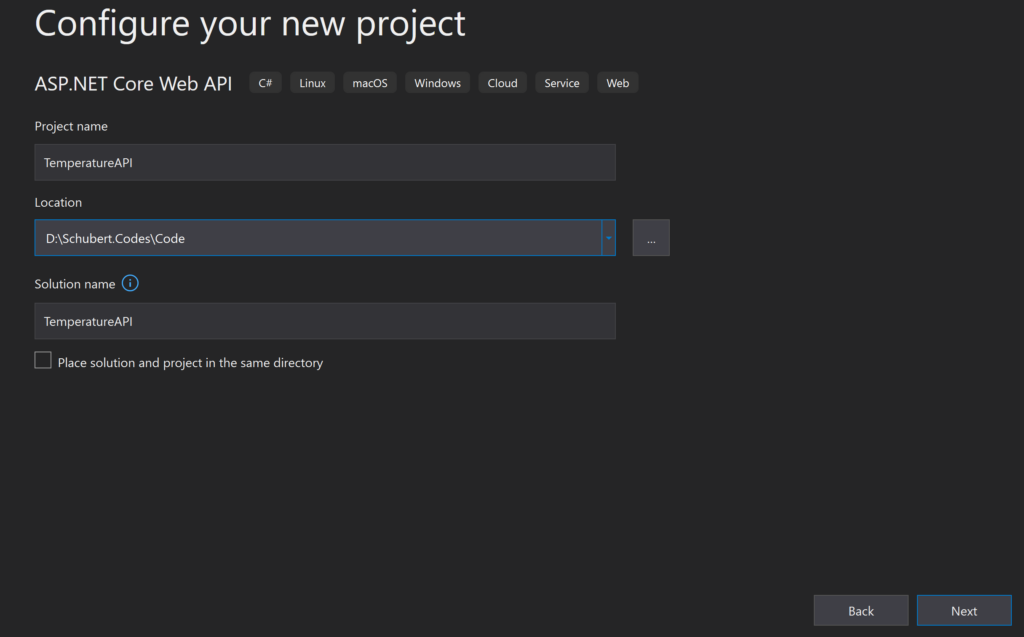
Choose “ASP.Net Core Web API” and Click “Next”. For the Project name enter “TemperatureAPI” and choose where you want to keep the project files. You can keep the defaults. I prefer to keep my code on a separate drive under a Code folder. And click Next.
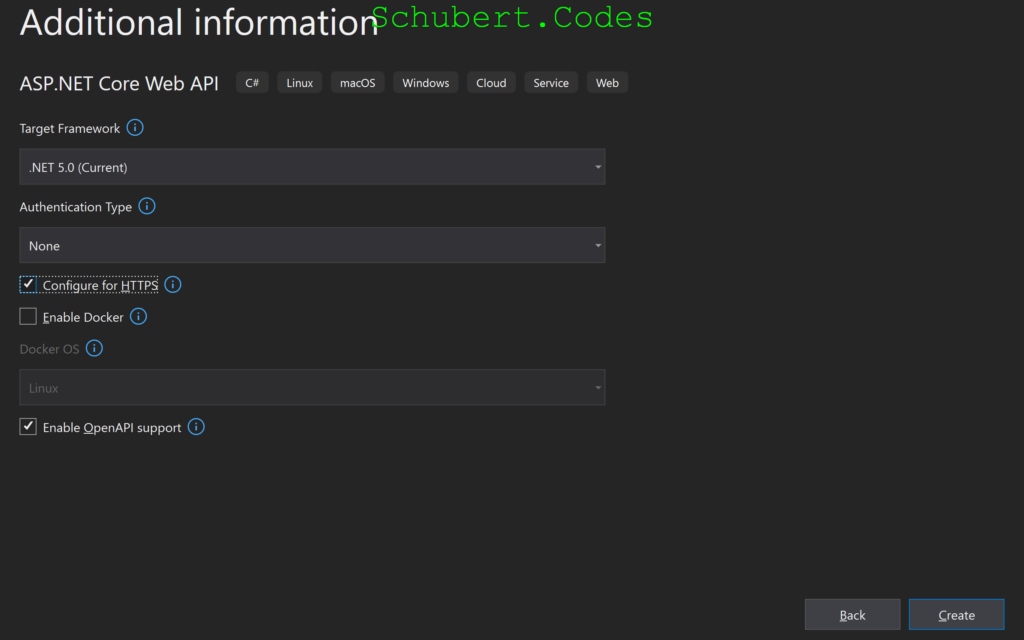
Under Additional Information, choose “.Net 5.0 (Current)” as the Target Framework. Although “.Net 6.0” isn’t too far off, most of the blog should work with that. We can leave the rest of the settings as is. We will get to Docker, DEVOPS and packaging your code in another blog. Click on Create
Hopefully you get to a screen like this. Click on the run with IIS Express button, this should be at the top of Visual Studio

After a bit of compiling, Vola! hopefully your first Web API should be up and running on your laptop. You should see a swagger page that looks like the below. We get this Swagger page because we choose “Enable OpenAPI support” during our project setup. Swagger makes it easy to see and share your WebAPI, if not, we would need to use tools like Fiddler or Postman to test our API endpoints

Now click on the blue GET bar and it should expand. Click “Try it out” and “Execute” and you should see a weather forecast similar to the below. The temperatures are dynamically generate, so you might see different results. And you can even see the response headers and the Curl command. Curl is another tool we could use to call and test APIs.
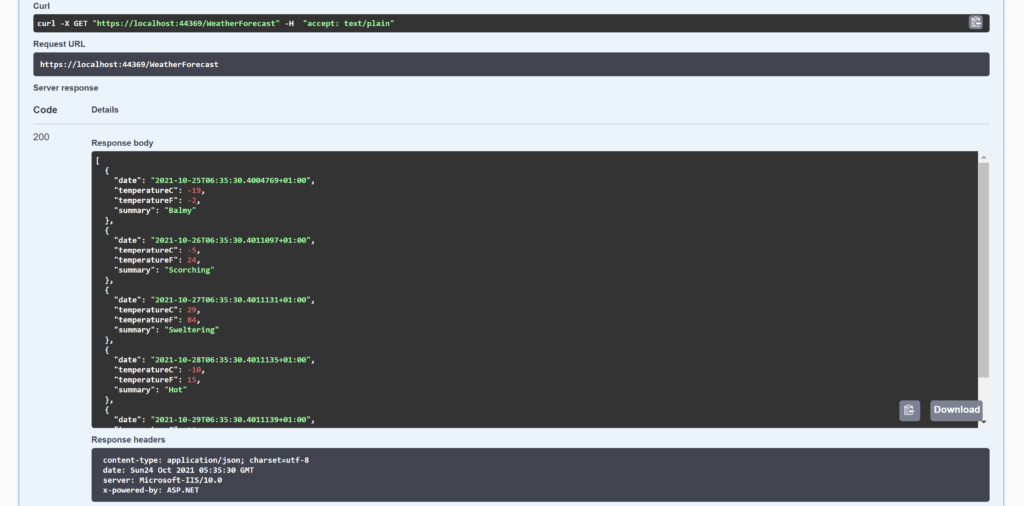
The nice thing about the GET HTTP verb is you don’t need swagger or any tool, you can do it right from your browse. Fun fact, when you browse to a website, you are actually tell your browse to indirectly do a GET request to that address you put in your browser. So we can can even test our new Web API by directly browsing to it. You should see something like this

You can browse to it a few times and see how the temperature reading change. Because they are randomly generated number we get different reading every time. Click on ‘Stop Debugging’ and we can move on to creating our Web API

How to create an Azure Cosmos data access layer using the repository pattern in C#?
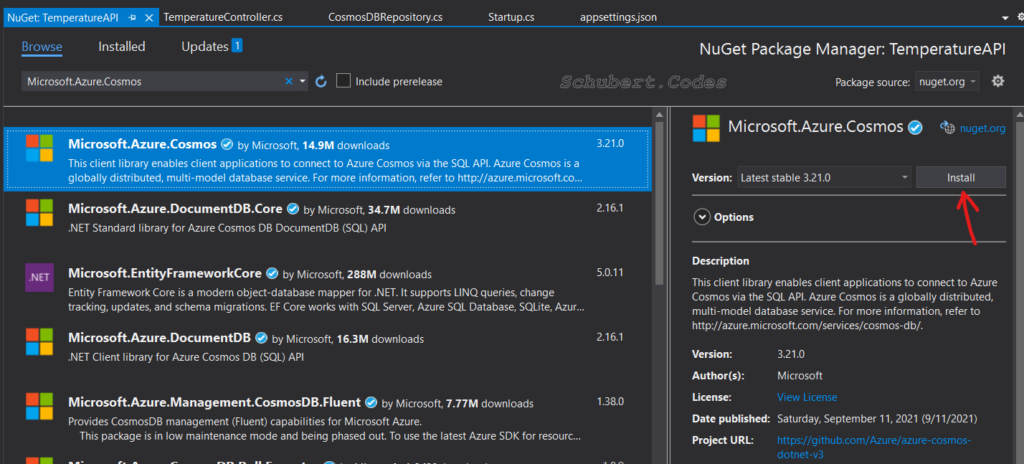
Lets start off by installing 2 packages in our project. We can do this by right clicking on Dependencies and selected “Manage NuGet Packages …”. Make sure the “Browse” tab is active and search for Microsoft.Azure.Cosmos and click Install. I’m installing version 3.21.0. If a newer latest stable version is available feel free to install that. Similarly, search for “Newtonsoft.Json” and install the latest stable version. I’ve installed 13.0.1.
Packages contain code that someone else has written that will make our coding easier because we can leverage the code written in the packages to speed up our development. A good example is System.Math that contains methods for trigonometric and other mathematical function. Or System.Collections for collection objects and data structures like arrays, list, queues and dictionaries. The libraries we are installing will help us by as listed below
- Microsft.Aure.Cosmos – to speak with Azure Cosmos DB easily
- Newtonsoft.Json – to deal with JSON data easily
Lets creating a plain C# class that will represent our temperature and humidity readings. We will call it TemperatureLog.cs and place it in the Models folder. If this folder does not exist, just right click on the project “TemperatureAPI” and then “Add” and “New Folder” to create it in the project. And the right click on the folder and select “Add” and “Class…” and enter the class name “TemperatureLog”. So we should have a folder and class like this in our Solution Explorer

In the TemperatureLog.cs file, we are going to put our temperature log properties. Properties store information like the name of the sensor, temperature reading, humidity reading. In order for our readings to be relevant when we plot them on the graph we need a timestamp property. We will be setting this in our controller class, which we will get to shortly. This is because our Arduino Uno does not know what time it is. We will get to programming an GPS chip that will help with location and time in a future blog. Also we need an Id property, this is common across majority of the DBs. This allow each reading to be uniquely identified in case we want to update it or delete it in the future. Hopefully you can see why we landed up with these properties
We also need to decorate these properties with a JsonProperty attribute. This is to tell .NETCore that want to use a different name when we save or retrieve our objects from Cosmos. For example, I have put lowercase humidity as my JSON property name, which is different from my C# property name which has a capital H. This is because JSON and web technologies like javascript tend to start property names in lowercase. Whilst high level languages like C# tend to start property names with uppercase. You should land up with something like this:
using Newtonsoft.Json;

namespace TemperatureAPI.Models
{
    public class TemperatureLog
    {
        [JsonProperty(PropertyName = "id")]
        public string Id { get; set; }
        [JsonProperty(PropertyName = "deviceName")]
        public string DeviceName { get; set; }
        [JsonProperty(PropertyName = "temperature")]
        public float Temperature { get; set; }
        [JsonProperty(PropertyName = "humidity")]
        public float Humidity { get; set; }
        [JsonProperty(PropertyName = "timestamp")]
        public string Timestamp { get; set; }
    }
}
Next lets look at the Repository Pattern. The way I see it, a repository is any place where we can store data. Think of it like a big bucket, we can put anything in it like books. We can then retrieve the data, i.e. see which books are in the bucket. Delete it from the repository i.e. remove a book. Or update it, remove all or some of the books and put new books in there.
There are some well known repositories on the market like MSSQL, which is good for relational and structured data. We have Azure Cosmos DB, which is great for distributed unstructured data. We can even save our temperature readings in Elastic Search, which is awesome if we needed to quickly search through our readings. Even a simple text file can be our repository and we could put our reading in there. But each type of repository has it’s advantages and disadvantages
I’ve choose Azure Cosmos as our repository because our data has no solid structure as yet. We are not sure what type of data we will want to save in the future. As we learn and add new sensors to our knowledge base, the data can take any shape over time. So say we learnt how to take reading using a soil humidity sensor, we can create a new JSON object just for that and those readings can almost effortlessly get saved into a non structured DB like Cosmos DB.
Back to the Repository Pattern, this is a fairly simple pattern. The pattern says we need to keep all the code that is related to a repository in a file or group of files separate from the rest of our code. In our case, we need code to speak to Cosmos DB, thus I’ll put all our code in a file called CosmosDBRepository.cs. And if we have code to speak to Elastic Search in the future than we can keep all that code in a file called ElasticSearchDBRepository.cs. This way it is very easy to find all the code in connection with a repository and make any fixes or updates or even swap them for one another, which lead me to another good principle.
The software principle we are going to look at is Dependency Injection. Simply put, this principle says if an object depends on another object, than we need to inject that other object into the first object.
Say our code in Temperature class needs to speak to CosmosDB repository class, then we can give (inject) our CosmosDBRepository class into our Temperature class. Similarly, if our Temperature class needs to speak to Elastic Search, then we can give (inject) our ElasticSearchDBRepository class into our Temperature class . One thing very nice about this principle is say we decided to use CosmosDB in 2021, then decide to use ElasticSeachDB in 2022 and then decide to use MSSQL DB in 2023, it makes it very easy to swap between the repositories because our Temperature class wouldn’t have a clue. We are deciding which repository to use and our temperature class is working with whatever repository class we give it. It does this using something called Interfaces. Enough theory, lets look at how this is really done in code
Let create a new folder and called it Repository. It will contain all our repository pattern classes. Right click “Temperature API” and “Add” and “New Folder”. Next, to create the Repository Interface, right click the “Repository” folder and “Add” and “New Item” and search for “Inteface (Visual C#)” and name it IRepository.cs

And in our interface file we put code like the below. This says that any class that implements our IRepository interface will have the below methods or will allow us to perform the below actions
using System.Collections.Generic;
using System.Threading.Tasks;

namespace TemperatureAPI.Repository
{
    public interface IRepository<T>
    {
        // Get all Items from our repository that matching this query
        Task<IEnumerable<T>> GetItemsAsync(string query);
        // Get an item from our repository that matching this id
        Task<T> GetItemAsync(string id);
        // Add an item to our repository
        Task AddItemAsync(T item);
        // Update an item in our repository
        Task UpdateItemAsync(T item);
        // Delete an item from our repository
        Task DeleteItemAsync(T item);
    }
}
And now lets create our Cosmos DB repository class. This will implement our Repository Interface. Right click Repository and “Add” and “Class…” and name the class CosmosDBRepository.cs. And in this class we have the real code that speak to the Cosmos Package that speaks to our Cosmos Emulator. Each repository will have it’s own unique code to speak to it, usually available in Packages by the people who built the repository. So MSSQL has it’s own package, Elastic Search has it’s own package, Azure DB has it’s own package … hopefully you get my drift here
using System.Linq;
using TemperatureAPI.Models;
using System.Threading.Tasks;
using Microsoft.Azure.Cosmos;
using System.Collections.Generic;
using TemperatureAPI.Settings;
using Microsoft.Extensions.Options;

namespace TemperatureAPI.Repository
{
    public class CosmosDBRepository : IRepository<TemperatureLog>
    {
        private Container _container;

        public CosmosDBRepository(
            CosmosClient dbClient,
            IOptionsSnapshot<CosmosDbSettings> settings)
        {
            var databaseName = settings.Value.DatabaseName;
            var containerName = settings.Value.ContainerName;
            this._container = dbClient.GetContainer(databaseName, containerName);
        }

        public async Task<IEnumerable<TemperatureLog>> GetItemsAsync(string queryString)
        {
            var query = this._container.GetItemQueryIterator<TemperatureLog>(new QueryDefinition(queryString));
            List<TemperatureLog> results = new();
            while (query.HasMoreResults)
            {
                var response = await query.ReadNextAsync();

                results.AddRange(response.ToList());
            }

            return results;
        }

        public async Task<TemperatureLog> GetItemAsync(string id)
        {
            try
            {
                ItemResponse<TemperatureLog> response = await this._container.ReadItemAsync<TemperatureLog>(id, new PartitionKey(id));
                return response.Resource;
            }
            catch (CosmosException ex) when (ex.StatusCode == System.Net.HttpStatusCode.NotFound)
            {
                return null;
            }
        }

        public async Task AddItemAsync(TemperatureLog item)
        {
            await this._container.CreateItemAsync(item, new PartitionKey(item.DeviceName));
        }

        public async Task UpdateItemAsync(TemperatureLog item)
        {
            await this._container.UpsertItemAsync<TemperatureLog>(item, new PartitionKey(item.DeviceName));
        }

        public async Task DeleteItemAsync(TemperatureLog item)
        {
            await this._container.DeleteItemAsync<TemperatureLog>(item.Id, new PartitionKey(item.DeviceName));
        }
    }
}
Notice how our Cosmos DB repository constructor takes in the CosmosClient class. This is another good example of Dependency Injection. Our Cosmos DB repository does not know which Cosmos DB it is speaking to, it just does the insert, update, delete or select using the client we give it. This makes it very easy for us to swap out the Cosmos DB emulator with Azure Cosmos DB running in the cloud. To setup our repository to speak to our local emulator we need to put it’s connection string in our settings file. Locate the appsettings.json and update it with your local emulator connection strings and password. We can get these setting from emulator details on the congratulation page we saw earlier. Mine looks like this
{
  "Logging": {
    "LogLevel": {
      "Default": "Information",
      "Microsoft": "Warning",
      "Microsoft.Hosting.Lifetime": "Information"
    }
  },
  "AllowedHosts": "*",
  "CosmosDb": {
    "Account": "https://localhost:8081",
    "Key": "C2y6yDjf5/R+ob0N8A7Cgv30VRDJIWEHLM+4QDU5DE2nQ9nDuVTqobD4b8mGGyPMbIZnqyMsEcaGQy67XIw/Jw==",
    "DatabaseName": "TemperatureLogs",
    "ContainerName": "Log"
  }
}
And to complete the DI we need to make a couple of changes in our Startup.cs file. We need to make .NETCore aware that if anyone ask for Cosmos Client, they should use one that is connected to our local emulator. And we also need to make .NETCore aware that if any one ask for an IRepository, they should use our CosmosDBRepository. Locate the startup.cs file and update it to looking like this:
using System.Linq;
using TemperatureAPI.Models;
using System.Threading.Tasks;
using Microsoft.Azure.Cosmos;
using System.Collections.Generic;
using TemperatureAPI.Settings;
using Microsoft.Extensions.Options;

namespace TemperatureAPI.Repository
{
    public class CosmosDBRepository : IRepository<TemperatureLog>
    {
        private Container _container;

        public CosmosDBRepository(
            CosmosClient dbClient,
            IOptionsSnapshot<CosmosDbSettings> settings)
        {
            var databaseName = settings.Value.DatabaseName;
            var containerName = settings.Value.ContainerName;
            this._container = dbClient.GetContainer(databaseName, containerName);
        }

        public async Task<IEnumerable<TemperatureLog>> GetItemsAsync(string queryString)
        {
            var query = this._container.GetItemQueryIterator<TemperatureLog>(new QueryDefinition(queryString));
            List<TemperatureLog> results = new();
            while (query.HasMoreResults)
            {
                var response = await query.ReadNextAsync();

                results.AddRange(response.ToList());
            }

            return results;
        }

        public async Task<TemperatureLog> GetItemAsync(string id)
        {
            try
            {
                ItemResponse<TemperatureLog> response = await this._container.ReadItemAsync<TemperatureLog>(id, new PartitionKey(id));
                return response.Resource;
            }
            catch (CosmosException ex) when (ex.StatusCode == System.Net.HttpStatusCode.NotFound)
            {
                return null;
            }
        }

        public async Task AddItemAsync(TemperatureLog item)
        {
            await this._container.CreateItemAsync(item, new PartitionKey(item.DeviceName));
        }

        public async Task UpdateItemAsync(TemperatureLog item)
        {
            await this._container.UpsertItemAsync<TemperatureLog>(item, new PartitionKey(item.DeviceName));
        }

        public async Task DeleteItemAsync(TemperatureLog item)
        {
            await this._container.DeleteItemAsync<TemperatureLog>(item.Id, new PartitionKey(item.DeviceName));
        }
    }
}
And finally the Temperature log controller, this is the class that connects the outside world with our Cosmos DB Repository. For now we only need a way to save our reading which we can do via the POST method. And we can get the latest 50 reading using the GET method. To add our new controller, right click on Controllers folder and “Add” and “Controller…” and “API Controller – Empty” controller, then name the new controller TemperatureLogController. My controller code looks like
using Microsoft.AspNetCore.Mvc;
using System;
using System.Linq;
using System.Collections.Generic;
using System.Threading.Tasks;
using TemperatureAPI.Models;
using TemperatureAPI.Repository;

namespace TemperatureAPI.Controllers
{
    [ApiController]
    [Route("[controller]")]
    public class TemperatureLogController : ControllerBase
    {
        private readonly IRepository<TemperatureLog> _cosmosDbRepository;

        public TemperatureLogController(IRepository<TemperatureLog> cosmosDbRepository)
        {
            _cosmosDbRepository = cosmosDbRepository;
        }

        [HttpGet]
        public async Task<IEnumerable<TemperatureLog>> Get()
        {
            var results = await _cosmosDbRepository.GetItemsAsync("SELECT * FROM c ORDER BY c.timestamp DESC OFFSET 0 LIMIT 30");
            return results.Select(x => new TemperatureLog
            {
                Id = x.Id,
                Humidity = x.Humidity,
                DeviceName = x.DeviceName,
                Temperature = x.Temperature,
                Timestamp = new DateTime(long.Parse(x.Timestamp)).ToString()
            });
        }

        [HttpPost]
        public async Task<ActionResult> Post(TemperatureLog temperatureLog)
        {
            temperatureLog.Id = Guid.NewGuid().ToString();
            temperatureLog.Timestamp = DateTimeOffset.UtcNow.ToUnixTimeSeconds().ToString();
            await _cosmosDbRepository.AddItemAsync(temperatureLog);
            return Ok();
        }
    }
}
Finally
Now press the Run in IIS Express button

And hopefully we can see the swagger page again but this time with our new Temperature Log endpoint too
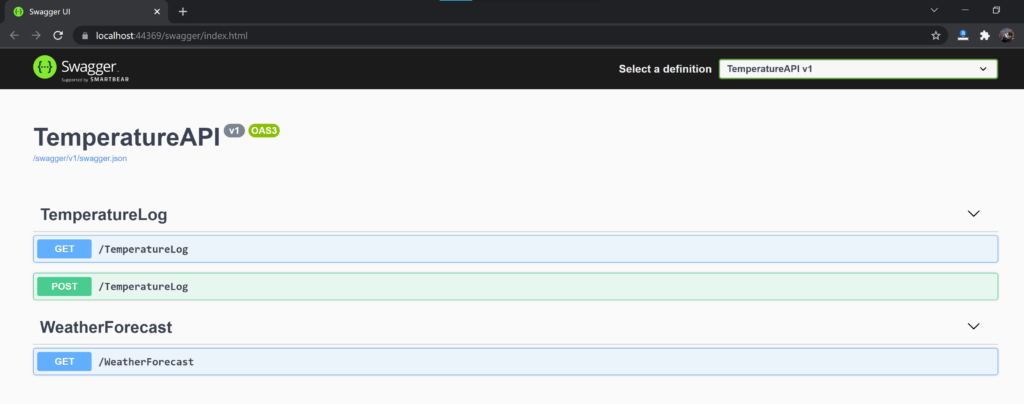
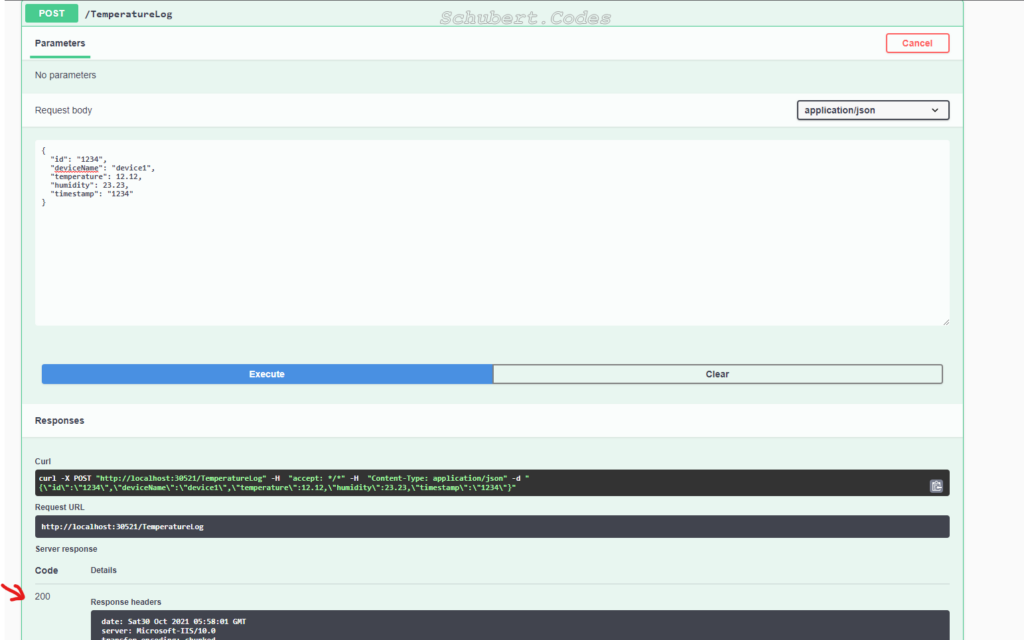
You can try out the GET request like we did when we created a new Web API C# project. At this point we have no saved reading in Cosmos DB thus the GET will return an empty result set. To get any reading we need to do a POST, the Arduino will be doing this for us shortly but just to test out thing, expand POST and fill in the body like below and click “Execute”. The id and timestamp can be any value, they will get overwritten in the code. We will cover a cleaner way to do this in a future post so we don’t see these properties here. For now, hopefully you will see a 200 response. This means the reading was saved and now the GET should return our single result.
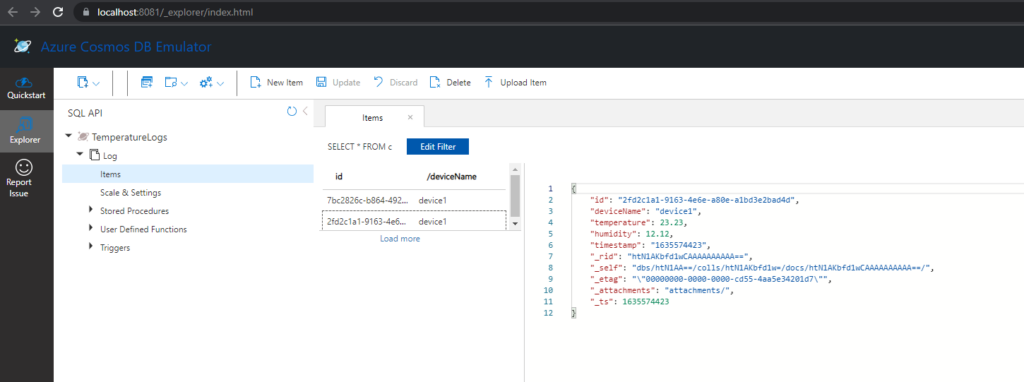
We can even go into the Cosmos DB emulator and confirm our reading are there. Click on Explore and then expand TemperatureLogs and then expand Logs and then click on Items. Feel free to post more reading and see them turn up in the emulator. When you have had enough fun, click on Delete on the top ribbon bar and have an empty DB for the next blog post
This blog post is already way longer than I had planned but we have covered a lot of ground here. I’m going to stop it here and in the next post we will work on the front end i.e. what the user will see. We will be using Angular and D3.js to plot graphs and we will be doing this from scratch too. Till next time, Happy Coding!
