I’ve had a few failed attempts at gardening and wanted to see if my passion for technology could help out. There are quiet a few sensors on the market like temperature, moisture, light, etc that I think could help. This spurred me to purchase an Arduino Uno Wifi R2 and even though I’ve owned an Arduino Duemilanove for a few years, its mostly been sitting in a pink anti-static bag collecting dust somewhere in my house. This Wifi enabled Arduino seemed to have hit the spot and also revived my interest in IoT, the amazing world of little devices and sensors
I’ve decided to start with the DHT11, a simple temperature and humidity sensor. We will program the Arduino Uno to collect the temperature and humidity readings from the DHT11 and POST them to our .NET Core webAPI app. The webAPI will then save the readings to an Azure Cosmos emulator running on our laptops. We will then use D3.js running in Angular to present the temperature and humidity readings in a colourful bar graph in our browser. After this we can dig into the wonderful world of Azure DEVOPS and making our WebAPI available 24 hours a day, 365 days a year. And then hopefully on to more cooler sensors and advance technologies
Let’s dig in
How to connect the DHT11 to Arduino Uno?
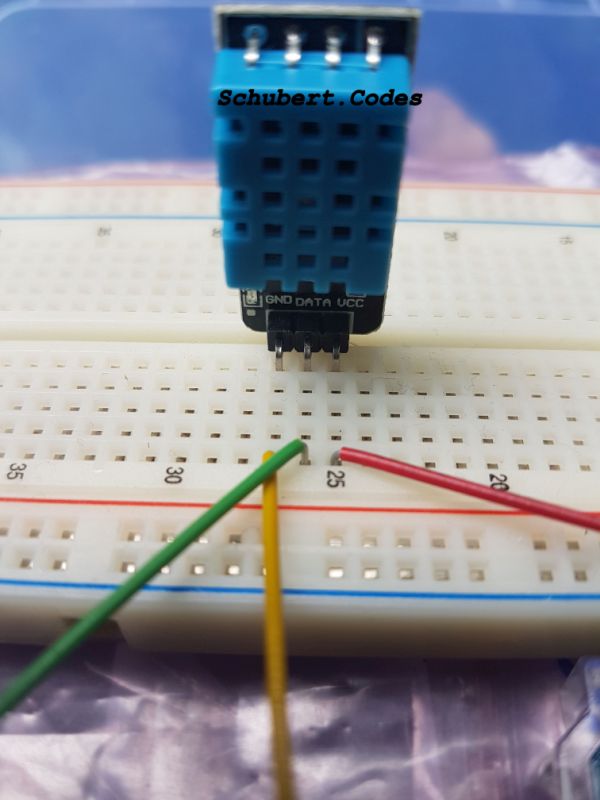
The DHT11 is a low-cost digital temperature and humidity sensor. The DHT11 sensor that I have has 3 legs and has a resistor integrated on to the board. If your DHT11 does not have the integrated resistor than this needs a resistor setup, which I’ll cover in another blog post

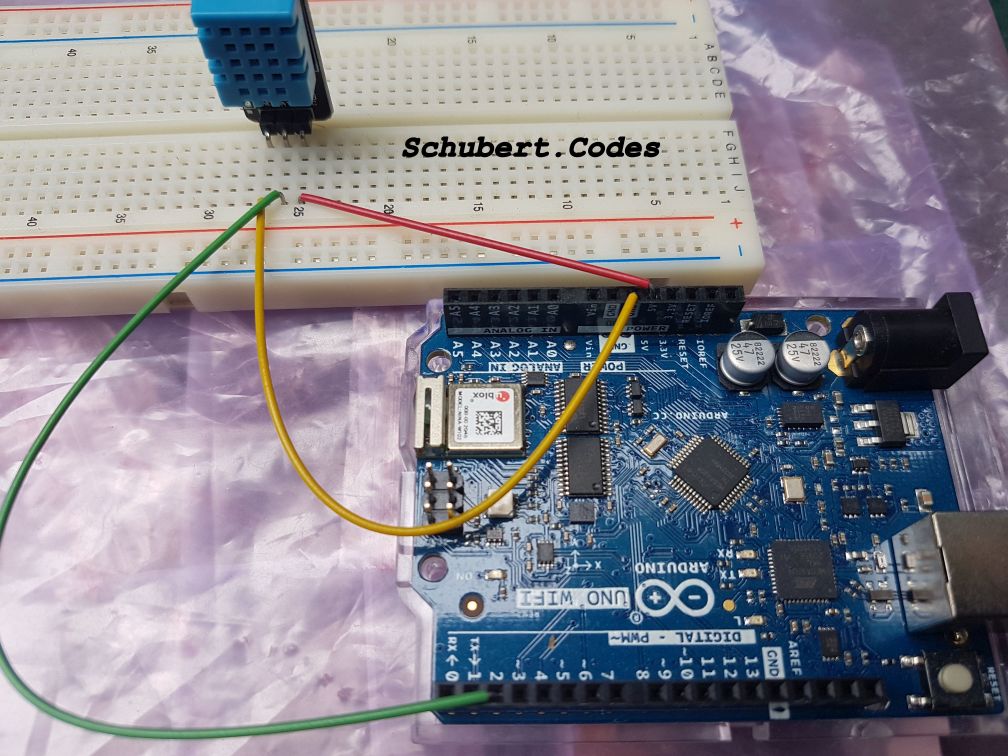
I’m using a breadboard, so my final circuit look like the below. I’ve seen a few DHT11 sensors with their legs switched around or have 4 legs, so please make sure your 5V wire goes from 5V on the Arduino to the Vcc leg of your DHT11. The ground wire goes from the GND on the Arduino to the GND leg of your DHT11. This leaves the DATA leg which needs to go from the DHT11 to 2nd Digital input on your Arduino. For the 4 leg DHT11, one leg is not used, just need to identify which one and not connect anything to it

How to connect your Arduino to your laptop and start collecting temperature and humidity readings from the DHT11?
As far as I can see there are 2 approaches to do this. Either download and install the Arduino IDE. Or you can take the approach I’ve taken, install the Arduino Agent and then code on their online IDE. Whichever IDE you choose, the rest of the step are similar. But I’ll be focusing on the online IDE here
- On the online IDE, create a new sketch (you can rename it if you like)

2. Then go to Libraries on the left menu and search for the ‘DHT Sensor Library’ and click the ‘Include’ button

This should add line 2 and 3 to your new sketch

3. The same library has a good example of how to read the sensor details like name, version, etc and get the readings. I have adjusted it and landed up with the below code:
// DHT sensor library - Version: Latest
#include <DHT.h>
#include <DHT_U.h>

#define DHTPIN 2
#define DHTTYPE DHT11

DHT_Unified dht(DHTPIN, DHTTYPE);
uint32_t delayMS;

void setup() {
  Serial.begin(9600);
  // Initialize device.
  dht.begin();
  // Print temperature sensor details.
  sensor_t sensor;
  dht.temperature().getSensor(&sensor);
  Serial.println(F("-----"));
  Serial.println(F("Temperature Sensor"));
  Serial.print  (F("Sensor Type: ")); Serial.println(sensor.name);
  Serial.print  (F("Driver Ver:  ")); Serial.println(sensor.version);
  Serial.print  (F("Unique ID:   ")); Serial.println(sensor.sensor_id);
  Serial.print  (F("Max Value:   ")); Serial.print(sensor.max_value); Serial.println(F("°C"));
  Serial.print  (F("Min Value:   ")); Serial.print(sensor.min_value); Serial.println(F("°C"));
  Serial.print  (F("Resolution:  ")); Serial.print(sensor.resolution); Serial.println(F("°C"));
  Serial.println(F("-----"));
  // Print humidity sensor details.
  dht.humidity().getSensor(&sensor);
  Serial.println(F("Humidity Sensor"));
  Serial.print  (F("Sensor Type: ")); Serial.println(sensor.name);
  Serial.print  (F("Driver Ver:  ")); Serial.println(sensor.version);
  Serial.print  (F("Unique ID:   ")); Serial.println(sensor.sensor_id);
  Serial.print  (F("Max Value:   ")); Serial.print(sensor.max_value); Serial.println(F("%"));
  Serial.print  (F("Min Value:   ")); Serial.print(sensor.min_value); Serial.println(F("%"));
  Serial.print  (F("Resolution:  ")); Serial.print(sensor.resolution); Serial.println(F("%"));
  Serial.println(F("-----"));
  // Set delay between sensor readings based on sensor details.
  delayMS = 60000;
}

void loop() {
  // Get temperature event and print its value.
  sensors_event_t event;
  dht.temperature().getEvent(&event);
  if (isnan(event.temperature)) {
    Serial.println(F("Error reading temperature!"));
  }
  else {
    Serial.print(F("Temperature: "));
    Serial.print(event.temperature);
    Serial.println(F("°C"));
  }
  // Get humidity event and print its value.
  dht.humidity().getEvent(&event);
  if (isnan(event.relative_humidity)) {
    Serial.println(F("Error reading humidity!"));
  }
  else {
    Serial.print(F("Humidity: "));
    Serial.print(event.relative_humidity);
    Serial.println(F("%"));
  }

  // Delay between measurements.
  Serial.println("Wait 60 seconds");
  delay(delayMS);
}
4. Make Sure COM5 is selected. If you have a different COM port coming up in the dropdown, then select it. This is needed so that the Agent can deploy your code to the Arduino and for us to see the Serial.Print() output on the Monitor tab when the code runs

5. Next we need to make sure our code compiles, so clicking the tick button beside the dropdown. Hopefully no errors appear, then click the right arrow button to deploy the code on to your Arduino
6. Then go to Monitor tab in the left menu and hopefully you should see something like this. A new temperature and humidity reading should appear every minute

How to connect your Arduino Uno Wifi R2 to your Wifi router?
Again my focus is going to be on the online IDE, although these steps should be similar for the Arduino IDE.
- Start by creating a new sketch

2. Next, select the Library tab and search for ArduinoHttpClient and click include

3. And also include the WIFININA library

4. Both libraries have really good examples, feel free to read through them. I have adjusted them and got the below as my final code:
#include <ArduinoHttpClient.h>
#include <WiFiNINA.h>

char ssid[] = SECRET_SSID;
char pass[] = SECRET_PASS;

int status = WL_IDLE_STATUS;

void setup() {
  Serial.begin(9600);
  while ( status != WL_CONNECTED) {
    Serial.print("Attempting to connect to Network named: ");
    Serial.println(ssid);                   // print the network name (SSID);

    // Connect to WPA/WPA2 network:
    status = WiFi.begin(ssid, pass);
    delay(60000); // Waiting for 60 seconds before attempting again
  }

  // print the SSID of the network you're attached to:
  Serial.print("SSID: ");
  Serial.println(WiFi.SSID());

  // print your WiFi shield's IP address:
  IPAddress ip = WiFi.localIP();
  Serial.print("IP Address: ");
  Serial.println(ip);
}

void loop() {
}
5. Another tab should appear, named ‘Secret’. Enter your SSID i.e. your wifi network name and Pass i.e. your wifi password. A little gotcha, the wifi has to be 2.4Hz. A lot of modern routes support both 5Hz and 2.4Hz. My TalkTalk router had both of them under the same name, so I had to login to the router as Admin and give the 2.4Hz a different name and then I was able to connect

6. Then go to Monitor tab in the left menu and hopefully you should see something like this. You can see your network name and the IP address that was assigned to your Arduino Uno Wifi R2

How to POST a message to a WebAPI endpoint using Arduino Uno Wifi R2?
Now that our Arduino Uno Wifi is able to obtain an IP address, we can access almost anything on our local network or even the internet. This is where it gets fun cause we can perform searches, look up data and even save and restore data. We are going to POST a simple Hello world JSON object to httpbin.org. It is a public server that replies with any data that is sent to it. So we should see our Hello world JSON object on the Monitor tab where we write out the response from the public server
7. Lets update the code in the previous example, so we get something like this:
#include <ArduinoHttpClient.h>
#include <WiFiNINA.h>

char ssid[] = SECRET_SSID;
char pass[] = SECRET_PASS;

char serverAddress[] = SECRET_SERVERADDRESS; // "httpbin.org";  // server address
char serverPort[] = SECRET_SERVERPORT; //80; // server port
char postUrl[] = SECRET_POSTURL; // /post

WiFiClient wifi;
HttpClient client = HttpClient(wifi, serverAddress, atoi(serverPort));

int status = WL_IDLE_STATUS;

void setup() {
  Serial.begin(9600);
  while ( status != WL_CONNECTED) {
    Serial.print("Attempting to connect to Network named: ");
    Serial.println(ssid);                   // print the network name (SSID);

    // Connect to WPA/WPA2 network:
    status = WiFi.begin(ssid, pass);
    delay(60000); // Waiting for 60 seconds before attempting again
  }

  // print the SSID of the network you're attached to:
  Serial.print("SSID: ");
  Serial.println(WiFi.SSID());

  // print your WiFi shield's IP address:
  IPAddress ip = WiFi.localIP();
  Serial.print("IP Address: ");
  Serial.println(ip);
}

void loop() {
  Serial.println("making POST request");
  // read the status code and body of the response
  String contentType = "application/json";
  String postData = "{\"message\":\"Hello World\"}";
  Serial.println(postData);
  client.post(postUrl, contentType, postData);

  int statusCode = client.responseStatusCode();
  String response = client.responseBody();

  Serial.print("Status code: ");
  Serial.println(statusCode);
  Serial.print("Response: ");
  Serial.println(response);
  Serial.println("Wait 60 seconds");
  delay(60000);
}
8. Another tab should appear, named ‘Secret’. Enter your SSID i.e. your wifi network name and Pass i.e. your wifi password. I’ve set the port to 80 for http, but we can set it to 443 to use https and secure our communication. Let do that in the final section, for now leave it as port 80, basic http. And ‘/post’ is the endpoint to send our data too. HttpBin.org has many testing endpoints, you can read more about them here

9. Then go to Monitor tab in the left menu and hopefully you should see something like this. You can see a new POST request and response every 60 seconds with our message: Hello World in the data section. And we can even see the headers we sent including User-Agent: Arduino, indicating the request came from an Arduino

Final Code
Lets merge the temperature and humidity reading code with the wifi initialisation and POST code and secure our POSTs by using WifiSSLClient and we land up with the below code:
// DHT sensor library - Version: Latest
#include <DHT.h>
#include <DHT_U.h>
#include <ArduinoHttpClient.h>
#include <WiFiNINA.h>

#define DHTPIN 2
#define DHTTYPE DHT11

char ssid[] = SECRET_SSID;
char pass[] = SECRET_PASS;

char serverAddress[] = SECRET_SERVERADDRESS; // "httpbin.org";  // server address
char serverPort[] = SECRET_SERVERPORT; //443; // server port
char postUrl[] = SECRET_POSTURL; // /post

WiFiSSLClient wifi;
HttpClient client = HttpClient(wifi, serverAddress, atoi(serverPort));
int status = WL_IDLE_STATUS;

DHT_Unified dht(DHTPIN, DHTTYPE);
uint32_t delayMS;

void setup() {
  Serial.begin(9600);
  // Initialize device.
  dht.begin();
  // Print temperature sensor details.
  sensor_t sensor;
  dht.temperature().getSensor(&sensor);
  Serial.println(F("------"));
  Serial.println(F("Temperature Sensor"));
  Serial.print  (F("Sensor Type: ")); Serial.println(sensor.name);
  Serial.print  (F("Driver Ver:  ")); Serial.println(sensor.version);
  Serial.print  (F("Unique ID:   ")); Serial.println(sensor.sensor_id);
  Serial.print  (F("Max Value:   ")); Serial.print(sensor.max_value); Serial.println(F("°C"));
  Serial.print  (F("Min Value:   ")); Serial.print(sensor.min_value); Serial.println(F("°C"));
  Serial.print  (F("Resolution:  ")); Serial.print(sensor.resolution); Serial.println(F("°C"));
  Serial.println(F("------"));
  // Print humidity sensor details.
  dht.humidity().getSensor(&sensor);
  Serial.println(F("Humidity Sensor"));
  Serial.print  (F("Sensor Type: ")); Serial.println(sensor.name);
  Serial.print  (F("Driver Ver:  ")); Serial.println(sensor.version);
  Serial.print  (F("Unique ID:   ")); Serial.println(sensor.sensor_id);
  Serial.print  (F("Max Value:   ")); Serial.print(sensor.max_value); Serial.println(F("%"));
  Serial.print  (F("Min Value:   ")); Serial.print(sensor.min_value); Serial.println(F("%"));
  Serial.print  (F("Resolution:  ")); Serial.print(sensor.resolution); Serial.println(F("%"));
  Serial.println(F("------"));
  // Set delay between sensor readings based on sensor details.
  delayMS = 60000;

  while(status != WL_CONNECTED) {
    Serial.print("Attempting to connect to Network named: ");
    Serial.println(ssid);                   // print the network name (SSID);

    // Connect to WPA/WPA2 network:
    status = WiFi.begin(ssid, pass);
    delay(60000);
  }

    // print the SSID of the network you're attached to:
  Serial.print("SSID: ");
  Serial.println(WiFi.SSID());

  // print your WiFi shield's IP address:
  IPAddress ip = WiFi.localIP();
  Serial.print("IP Address: ");
  Serial.println(ip);
}

void loop() {
  // Get temperature event and print its value.
  sensors_event_t event;
  dht.temperature().getEvent(&event);
  String temperature;
  String humidity;
  if (isnan(event.temperature)) {
    Serial.println(F("Error reading temperature!"));
  }
  else {
    Serial.print(F("Temperature: "));
    Serial.print(event.temperature);
    Serial.println(F("°C"));
    temperature = event.temperature;
  }
  // Get humidity event and print its value.
  dht.humidity().getEvent(&event);
  if (isnan(event.relative_humidity)) {
    Serial.println(F("Error reading humidity!"));
  }
  else {
    Serial.print(F("Humidity: "));
    Serial.print(event.relative_humidity);
    Serial.println(F("%"));
    humidity = event.relative_humidity;
  }

  Serial.println("making POST request");
  String contentType = "application/json";
  String postData = "{\"name\":\"dht11-sensor1\",\"temperature\":\"" + temperature + "\",\"humidity\":\"" + humidity + "\"}";
  Serial.println(postData);
  client.post(postUrl, contentType, postData);
  int statusCode = client.responseStatusCode();
  String response = client.responseBody();

  Serial.print("Status code: ");
  Serial.println(statusCode);
  Serial.print("Response: ");
  Serial.println(response);

  // Delay between measurements.
  Serial.println("Wait 60 seconds");
  delay(delayMS);
}
Another tab should appear, named ‘Secret’. Enter your SSID i.e. your wifi network name and Pass i.e. your wifi password. This time for the server port enter 443, which is the HTTPS port. This will secure our communication with the public server and encrypt our data as it travels across the internet

And if all works well, we should initially see some sensor details, like type, max value, min value, etc. Then the Arduino try to connect to our WIFI, the sensor being read, the sensor readings being POSTed in JSON format to httpbin.org using HTTPS and a 200 status response with our sensor readings in the response data. And it should do this every 60 seconds. Voila!

In the next blog we will look at running the Azure Cosmos emulator on our laptops. It will be used as our data store to save our temperature and humidity readings. We will then create our very own .NETCore WebAPIs to save and restore our readings from Cosmos. More exciting tech to follow. Hope this blog was easy to follow, even for someone with no technical skill but a passion for technology
